How-To Guide and FAQs
Updated January 2024
Resources
FAQs
- Creating an Event
- Payments/Funds
- All payments will go to one general account. In ePly, there was an option to add a G/L account, however, the same option is not available on Eventbrite. To make sure your department gets the funds, please fill out the shared spreadsheet (in Step One of Creating an Event; see below) with your G/L account.
- Ticket Fees
- Tickets may be paid, free, or donations. For paid tickets, make sure the “Absorb Fees” checkbox is checked. The transactional fees are the university’s responsibility, not the buyer's. For donations, make sure the “Absorb Fees” checkbox is checked as it is a donation(s).
- Refunds
- Eventbrite will hold a percentage of sales (10%) in reserves until the event is over, this is to account for refunds etc. Eventbrite has its own payment gateway so refunds would be initiated through Eventbrite. This knowledge base article explains the process.
Note: For June of 2023, Eventbrite accidentally charged 20% rather than 10%.
- Membership Forms
- Unlike ePly, Eventbrite does not send the money until the event is over. Therefore, for membership forms (e.g. Casa Italiana, Recreation, etc.), please create new forms every half-year (Spring/Summer with the date range of 1/1-6/30 vs. Fall/Winter with the date range 7/1-12/31).
- Registration Emails
- On ePly, there was an option to add email addresses that will receive emails on an event to event basis. However, this is not an option in Eventbrite. ITS is currently (June 2023) working to find work arounds. In current state, all emails will go to the organization’s email address (Nazareth University’s email address associated with the Eventbrite account; event_support@naz.edu). For the time being, this email inbox will be monitored by admins. If a workaround is not found, email rules will be set up for this inbox so emails may be directed to selected individuals per event.
- Receiving Emails for Events You Did Not Post
- Because our Eventbrite account is campus-wide, emails will be sent for every event, not just the event you created. This includes requests for refunds and refund notifications. Make sure to monitor your own event within Eventbrite so you don't accidentally grant refunds for events that you do not own.
- How-To Turn Off Email Notifications
- To change your email notifications, log into Eventbrite, go to 'Account Settings' (under your email in the top right corner), then click 'Email Preferences' on the left side pane. From there you can check/uncheck your email notification preferences.
Creating an Event at Nazareth University
- Fill out the shared spreadsheet located here to ensure you will receive the funds for the event (since the Controller's Office needs your G/L account number, pricing, etc.).
- Make sure you have an account and are logged in. To get an Eventbrite general user account associated with Nazareth, please contact (admin): Jean Hoyt at jhoyt0@naz.edu
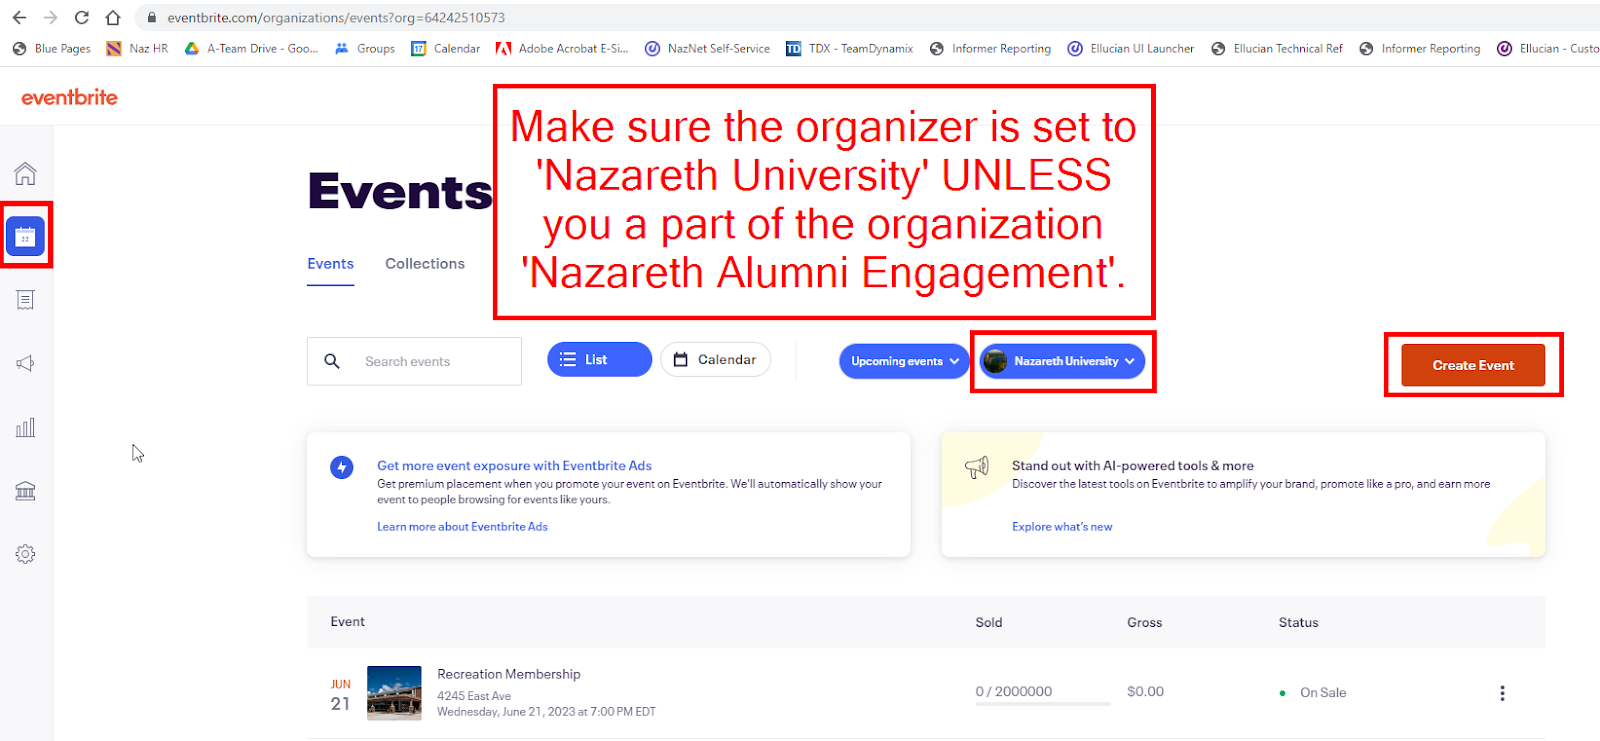
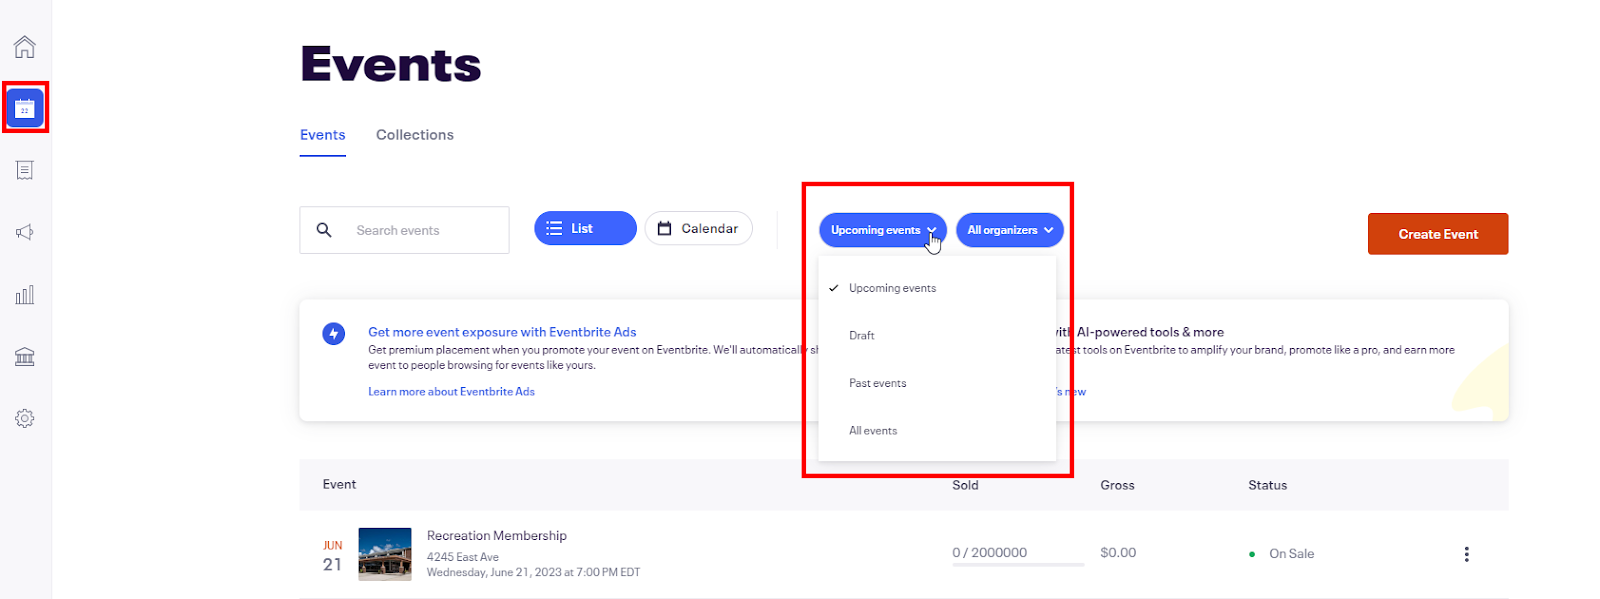
- Once logged in, click the calendar icon on the left pane (which brings you to the events tab) then click “Create Event”.
- After clicking “Create Event”, you’ll be asked about the basic information for your event. Make sure the organizer is listed as “Nazareth University” unless you are a part of the organization “Nazareth Alumni Engagement”. Tags will automatically populate but double check to make sure the listed tags are relevant to your event.

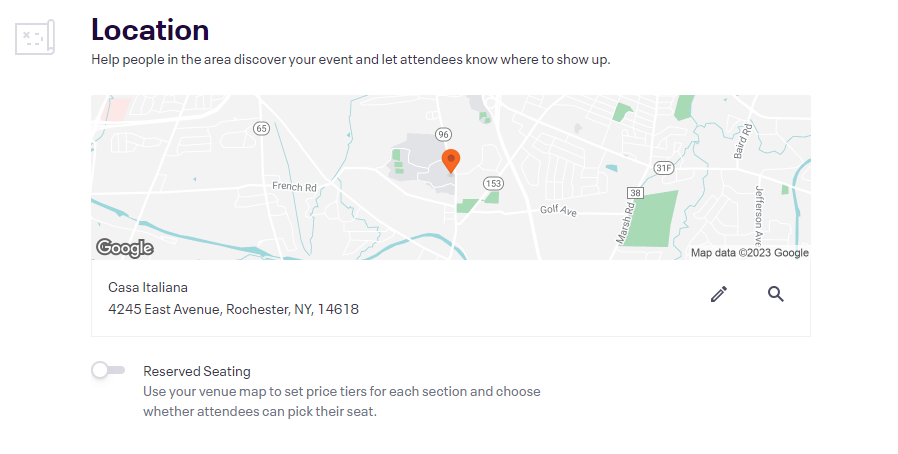
- For the location venue, put where the location will be (e.g. you can search “Casa Italiana” and the address will appear). You may also set your location to an online event or an event that has yet to be announced.
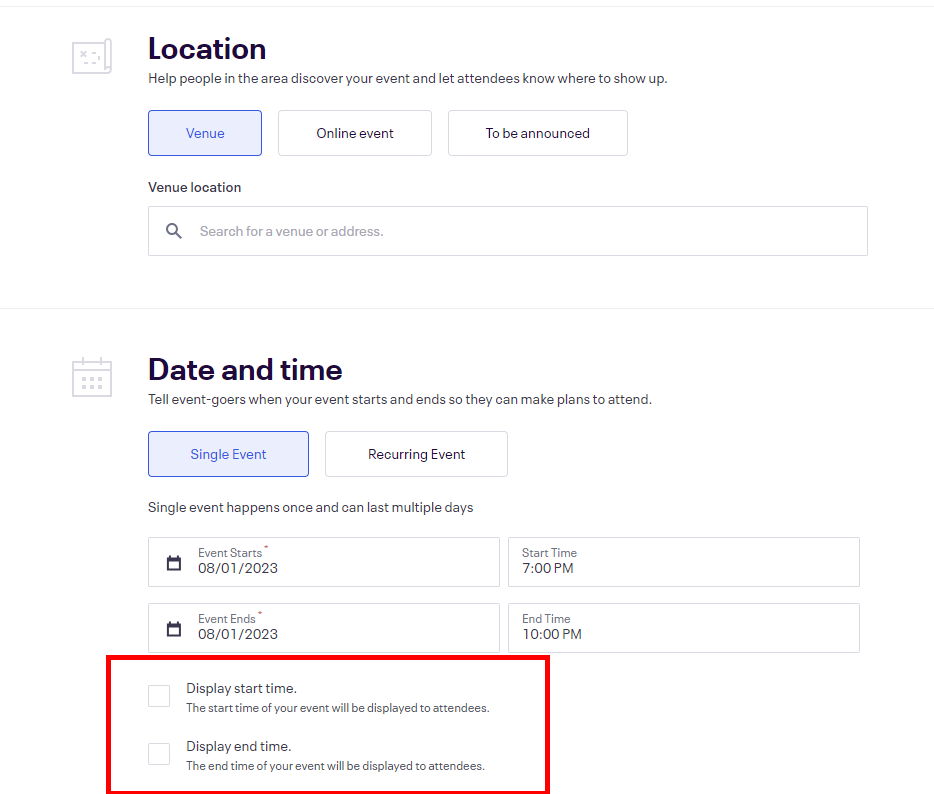
- For date and time, uncheck “Display Start Time” and “Display End Time” and put the start and end times in your event summary later on (Step 7). Doing this removes excess information on the ticket (if you have these boxes checked then the date format will be long and clunky rather than just stating a simple date such as “June 30th at 3PM”). For paid forms/membership forms (e.g. Recreation Membership, Medication/Vaccine Payment Form, etc.), you will want to click “Single Event”, and then for these types of forms, please create new forms every half-year (Spring/Summer with the date range of 1/1-6/30 vs. Fall/Winter with the date range 7/1-12/31).
- For event media, you may choose to add a photo or video but it is completely optional.
- For the summary, this is where you will want to give a brief description of the event and include the event date and time (start and end if applicable). For the description, this is where you add the finer details of the event. You may also add sections to your event that include an agenda or FAQs. These are also optional.
- As for tickets, you can copy tickets from an already created event, or create new tickets. A majority of the time, you will need to create new tickets. Tickets may be paid, free, or donations. For paid tickets, make sure the “Absorb Fees” checkbox is checked. The transactional fees are the university’s responsibility, not the buyer's. For donations, make sure the “Absorb Fees” checkbox is checked as it is a donation(s).


- Before publishing your event, you can preview the event to determine what it looks like. The event will automatically be saved as a draft if you decide the event is not ready to be published (see Step 10). You may make the event public or private (with the default option being public), and may also schedule to publish the event. For any internal memberships or forms, the event should be listed as private. Private events may be shared via URL. This is beneficial for using via email or for publishing a hyperlink on internal websites for students, staff, and faculty to access (rather than the general public).

- To access published events and drafts, go back to the events tab (by clicking the calendar icon on the left pane) and select the drop-down menu that says “Upcoming Events”. “Upcoming Events” shows the published events, however, when clicking the drop-down, there is the option to switch to “Draft” (as well as the options “Past Events” and “All Events”.